Description
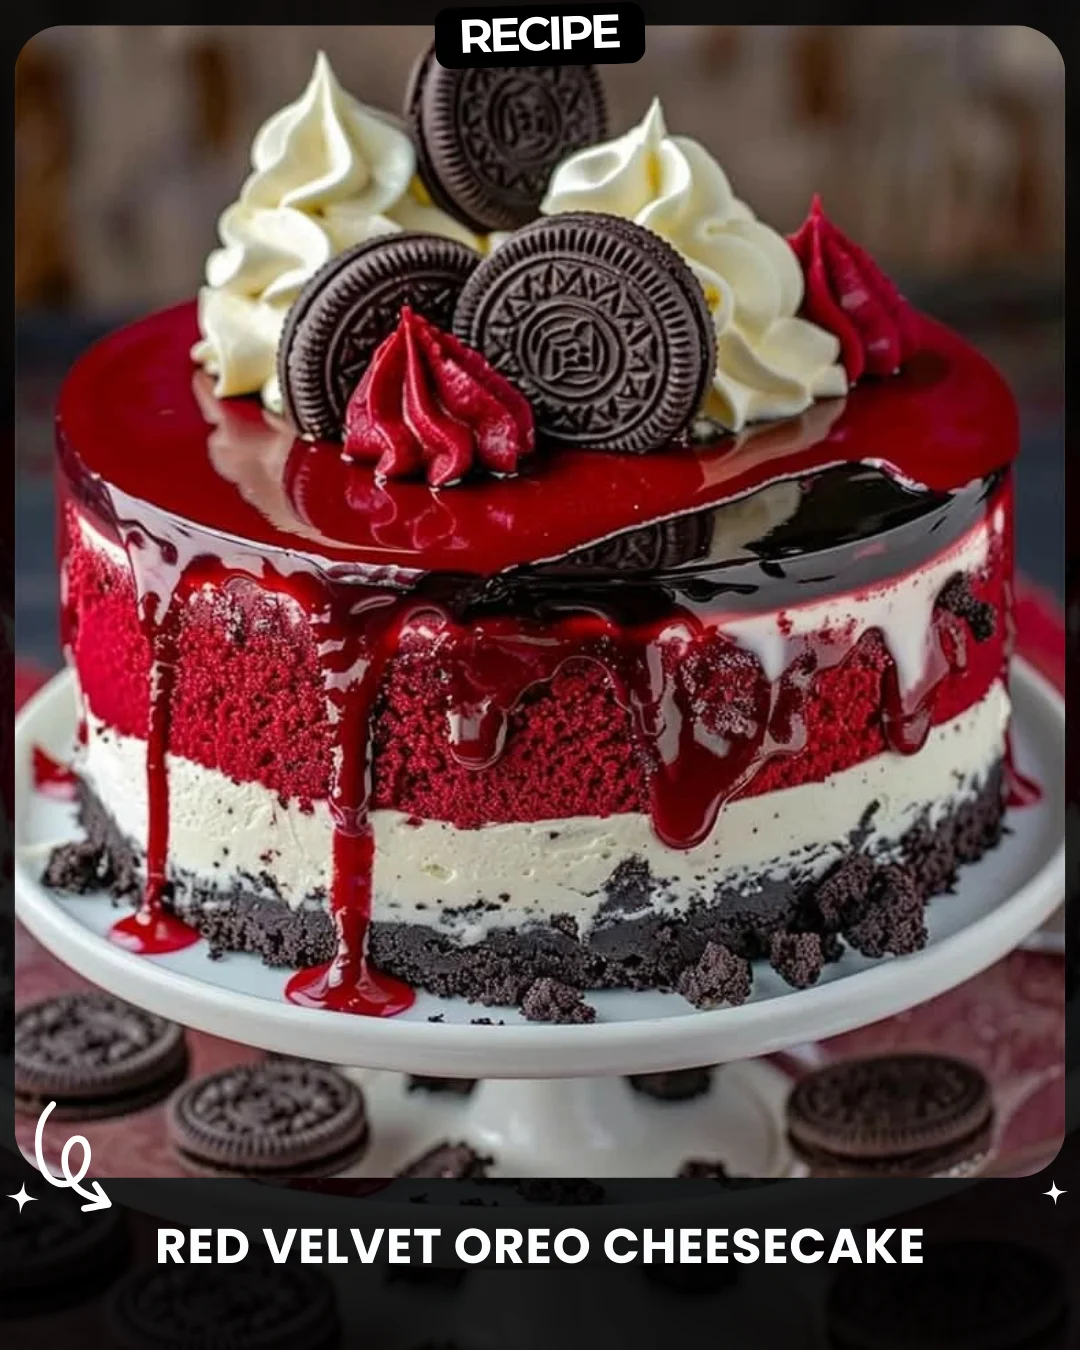
Red Velvet Oreo Cheesecake
Ingredients:
For the Red Velvet Cheesecake:
3 (8 oz) packages cream cheese, softened
1 cup granulated sugar
3 large eggs
1/2 cup sour cream
1 teaspoon vanilla extract
1 tablespoon all-purpose flour
1/2 cup buttermilk
1 tablespoon red food coloring (adjust based on desired intensity)
1/2 cup cocoa powder (unsweetened)
For the Oreo Crust:
1/4 cup unsalted butter, melted
1 package (15-16 cookies) of Oreo cookies (regular, not double-stuffed)
For the Topping (Optional):
Whipped cream
Crumbled Oreo cookies
Red velvet cake crumbs or mini Oreos for decoration
Instructions:
1. Prepare the Oreo Crust:
Preheat your oven to 325°F (163°C).
Crush the Oreos (either in a food processor or by placing them in a sealed plastic bag and using a rolling pin) until they become fine crumbs.
In a mixing bowl, combine the Oreo crumbs with melted butter. Stir until the mixture is evenly coated.
Press the Oreo mixture into the bottom of a 9-inch springform pan. Use the back of a spoon or your hands to compact it evenly.
Bake the crust in the preheated oven for 10 minutes, then remove and set aside to cool.
2. Prepare the Red Velvet Cheesecake Batter:
In a large bowl, beat the softened cream cheese with a hand mixer or stand mixer until smooth and creamy.
Add the granulated sugar and beat until fully incorporated.
Add the eggs, one at a time, beating well after each addition.
Stir in the sour cream, vanilla extract, cocoa powder, and salt. Mix until smooth.
Add the buttermilk and red food coloring and mix until the batter is well combined and smooth.
Finally, sprinkle in the flour and stir to combine.
3. Assemble the Cheesecake:
Pour about half of the cheesecake batter onto the prepared Oreo crust in the springform pan.
Gently crumble some Oreos into small pieces and scatter them on top of the batter (optional).
Pour the remaining cheesecake batter on top, spreading it evenly with a spatula.
4. Bake the Cheesecake:
Tap the pan gently on the counter to remove any air bubbles.
Bake the cheesecake in the preheated oven at 325°F for 50-60 minutes. The center should be set but still slightly jiggly. If the top begins to brown too much, cover it loosely with aluminum foil.
Turn off the oven and let the cheesecake cool in the oven with the door slightly ajar for about 1 hour.
5. Chill the Cheesecake:
After the cheesecake has cooled to room temperature, cover it with plastic wrap or foil and refrigerate it for at least 4 hours, or overnight, to fully set.
6. Decorate and Serve:
Once the cheesecake is chilled and set, you can top it with whipped cream, crumbled Oreo cookies, and red velvet cake crumbs for a decorative touch.
Slice and enjoy the rich, creamy goodness of red velvet Oreo cheesecake!
This cheesecake is a perfect combination of tangy cream cheese, chocolatey red velvet, and the crunchy texture of Oreos, making for a decadent dessert that’s sure to impress!
#lovealletherecipes #dessert
Step-by-Step Guide
Follow this detailed guide for a flawless cheesecake. Begin by ensuring all ingredients, especially the cream cheese, are at room temperature for a smooth batter. Use a food processor for the Oreo crust to achieve uniform fine crumbs. When pressing the crust, use a flat-bottomed glass to create a firm, even base. For the batter, scrape down the bowl sides frequently to ensure even mixing. The optional Oreo layer in the middle adds great texture; use about 5-6 cookies, broken into large chunks. The key to preventing cracks is the gradual cooling process: after baking, let it cool in the turned-off oven, then on the counter, and finally refrigerate.
Serving Suggestions
Serve each slice with a dollop of freshly whipped cream and a sprinkle of Oreo crumbs. For a festive touch, drizzle with a white chocolate ganache or a raspberry coulis to complement the red velvet. Pair with a scoop of vanilla bean ice cream for an indulgent dessert experience. This cheesecake is perfect for holidays, birthdays, or as a stunning centerpiece at any dinner party.
How-to Summary
Create an Oreo crust, bake it briefly, and cool. Mix cream cheese, sugar, eggs, and flavorings until smooth. Add buttermilk and red food coloring. Layer half the batter over the crust, add optional Oreo pieces, then top with remaining batter. Bake in a water bath for best results, cool gradually, and chill overnight before decorating and serving.
Frequently Asked Questions
Can I use a different type of Oreo? Yes, but for the crust, avoid Double Stuf or flavored varieties as they alter the butter-to-crumb ratio. For mix-ins, Mint or Golden Oreos can add a fun twist.
How do I prevent my cheesecake from cracking? The most effective method is using a water bath. Wrap the springform pan bottom in foil, place it in a larger roasting pan, and fill the outer pan with hot water halfway up the cheesecake pan's sides before baking.
Can I make this without a springform pan? A 9-inch deep-dish pie plate can work, but removal will be messy. For best results, a springform pan is highly recommended.
How long does it keep? Properly covered, it lasts up to 5 days in the refrigerator. You can also freeze it (without toppings) for up to 2 months. Thaw overnight in the fridge before serving.
Can I use natural food coloring? Absolutely, but you may need a larger quantity (like beet powder) to achieve a vibrant red, which could slightly alter the flavor.
Common Mistakes to Avoid
- Using cold cream cheese, which leads to a lumpy batter.
- Overmixing the batter after adding eggs, which incorporates too much air and causes cracking.
- Not properly sealing the springform pan for the water bath, resulting in a soggy crust.
- Opening the oven door during baking, causing a sudden temperature drop.
- Skipping the long chilling time; the cheesecake must set fully for perfect texture.
Conclusion
This Red Velvet Oreo Cheesecake masterfully combines the tangy richness of cheesecake with the iconic flavors of red velvet and Oreo. By following the detailed steps and avoiding common pitfalls, you can create a visually stunning and decadently delicious dessert that is sure to impress any crowd. The contrast of the creamy filling, crunchy crust, and festive toppings makes it a memorable treat for any occasion.