Description
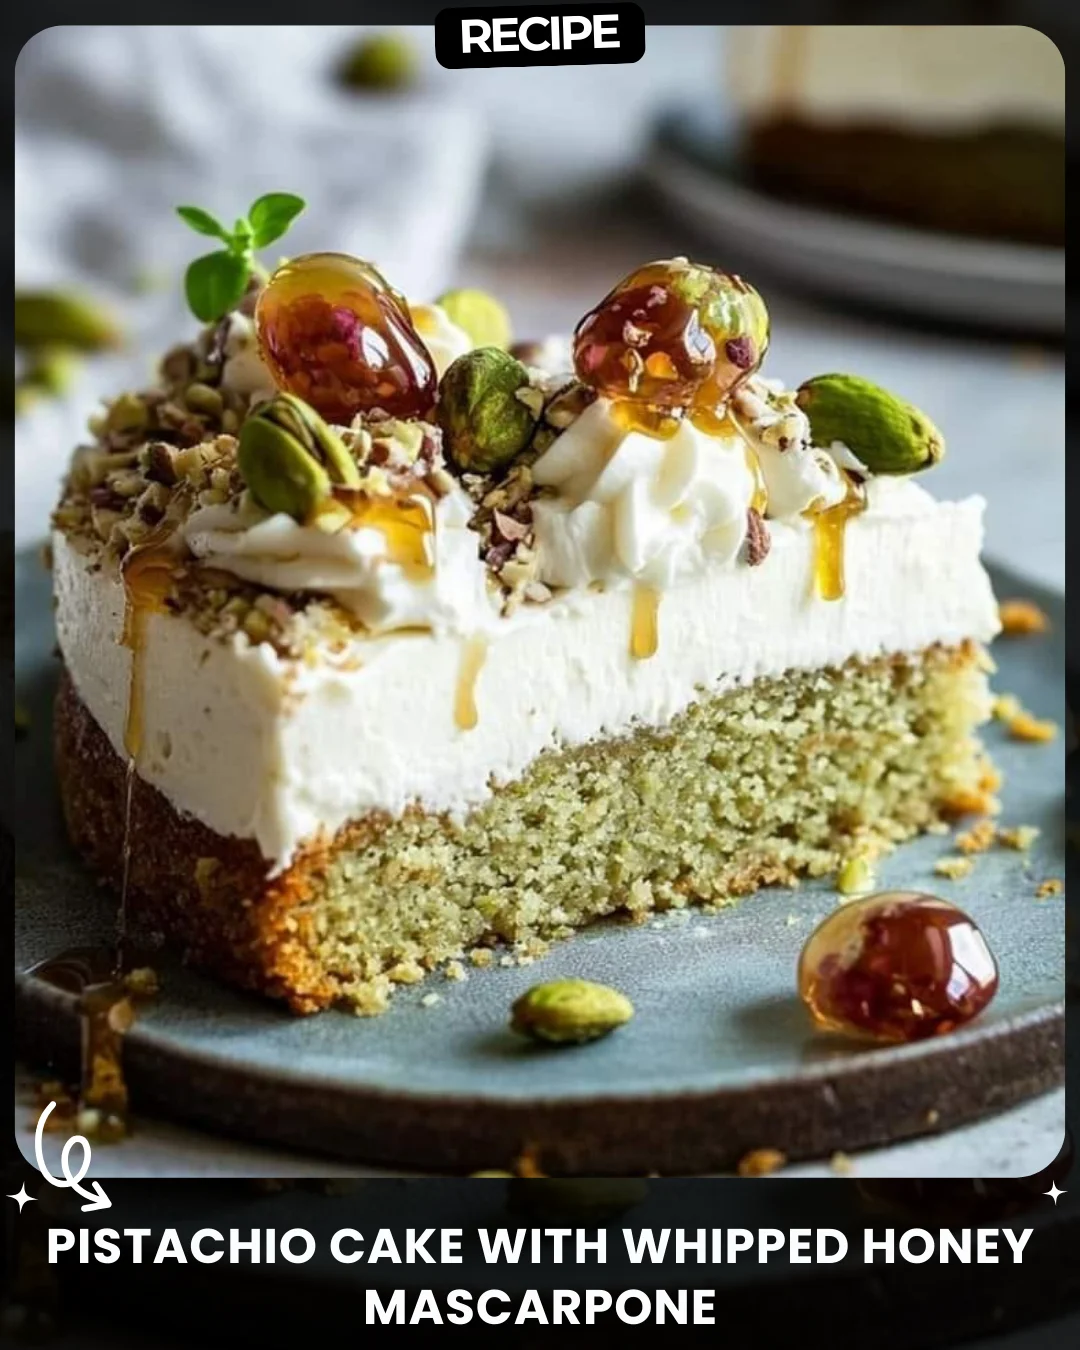
Pistachio Cake with Whipped Honey Mascarpone
This Pistachio Cake topped with Whipped Honey Mascarpone is a delightful and elegant dessert perfect for any occasion. The pistachio cake is moist and flavorful, while the whipped honey mascarpone adds a creamy, sweet touch.
Ingredients
Pistachio Cake:
4 oz roasted, salted pistachios
6 oz cake flour
1 tsp baking powder
½ tsp baking soda
1 tsp kosher salt
2 eggs
8 oz granulated sugar
1 cup vegetable oil
¾ cup whole milk
1 tbsp pure vanilla extract
Strawberries (for decoration)
Chopped pistachios (for decoration)
Honey (for drizzling)
Whipped Honey Mascarpone:
1 cup heavy cream
8 oz mascarpone cheese
¼ cup honey
¼ tsp kosher salt
Instructions
1. Make the Pistachio Cake:
Preheat Oven: Preheat your oven to 350°F (175°C). Grease a 10” cake pan with butter.
Prepare Pistachios: Add the pistachios to a food processor and pulse until finely ground.
Mix Dry Ingredients: In a large mixing bowl, whisk together the ground pistachios, cake flour, baking powder, baking soda, and salt. Set aside.
Mix Wet Ingredients: In a separate bowl, beat the eggs. Whisk in the granulated sugar, followed by the vegetable oil, then the milk and vanilla extract.
Combine: Pour the wet ingredients into the dry ingredients, whisking until just combined.
Bake: Pour the batter into the prepared cake pan. Bake for about 36-40 minutes, or until a toothpick inserted into the center comes out fairly dry.
Cool: Let the cake cool in the pan for 15 minutes. Run a butter knife along the edges and flip the cake onto a cooling rack. Allow to cool fully.
Level Cake: Use a serrated knife to even off the top of the cake.
2. Prepare the Whipped Honey Mascarpone:
Whip Cream: Add the heavy cream to the bowl of a stand mixer fitted with a whisk attachment. Whip the cream on medium-high speed until semi-stiff peaks form (be careful not to overwhip). Transfer the whipped cream to a different bowl and set aside.
Mix Mascarpone: Add the mascarpone cheese, honey, and salt to the stand mixer bowl. Using the paddle attachment, mix on medium-high speed for about 1 minute to aerate the mixture.
Fold Together: Gently fold the whipped cream into the mascarpone mixture in two additions until fully incorporated. Use at room temperature.
3. Assemble the Cake:
Frost Cake: Mound the whipped honey mascarpone on top of the cooled cake. Use an offset spatula to spread the mascarpone into an even layer on top and along the sides.
Decorate: Decorate with strawberries (or any other berry) and chopped pistachios. Drizzle with honey just before serving.
Notes:
Storage: Keep the cake in the refrigerator if not serving immediately to keep the mascarpone frosting fresh.
Variation: You can use other berries or nuts for decoration depending on your preference.
Enjoy your Pistachio Cake with Whipped Honey Mascarpone – a delightful treat with a perfect balance of nutty, sweet, and creamy flavors!
#lovealletherecipes
Step-by-Step Guide
Follow these detailed steps for a perfect cake. First, ensure your pistachios are finely ground but not oily; pulse in short bursts. When combining wet and dry ingredients, whisk only until no streaks of flour remain to avoid a tough crumb. For the frosting, ensure your mascarpone and heavy cream are very cold to achieve stable peaks. Fold the whipped cream into the mascarpone mixture gently to maintain its airy texture. When assembling, let the cake cool completely to prevent the frosting from melting.
Serving Suggestions
This elegant cake is versatile. Serve it as a stunning centerpiece for afternoon tea or a dinner party finale. Pair each slice with a glass of dessert wine like Moscato d'Asti or a cup of strong espresso. For a festive touch, garnish with edible flowers alongside the berries and pistachios. The cake can also be presented as individual mini-cakes or layered in a trifle for a creative twist.
How-to Summary
To summarize: Grind pistachios and mix with dry ingredients. Separately combine eggs, sugar, oil, milk, and vanilla. Fold wet into dry, then bake at 350°F for 36-40 minutes. Cool completely. For frosting, whip cream to semi-stiff peaks, then aerate mascarpone with honey and salt. Fold cream into mascarpone. Frost the cooled cake and decorate with berries, nuts, and a honey drizzle.
Frequently Asked Questions
Can I use all-purpose flour instead of cake flour?
Yes, but for every cup of all-purpose flour, remove two tablespoons and replace with two tablespoons of cornstarch to mimic cake flour's tenderness.
My mascarpone frosting is runny. How can I fix it?
Ensure all components are cold. If it's too soft, place the bowl in the freezer for 10-15 minutes, then re-whip briefly. Avoid overfolding.
Can I make the cake layers ahead of time?
Absolutely. Wrap the cooled cake layers tightly in plastic wrap and freeze for up to a month. Thaw at room temperature before frosting.
Is there a substitute for mascarpone?
Full-fat cream cheese can be used, but the flavor will be tangier. Whip it well with the honey to soften first.
Why did my cake sink in the middle?
This is often due to underbaking, opening the oven door too early, or using expired leavening agents. Ensure your baking powder and soda are fresh.
Common Mistakes to Avoid
- Over-processing Pistachios: Pulse until finely ground; over-processing releases oils and creates a paste.
- Overmixing the Batter: This develops gluten, leading to a dense cake. Mix until just combined.
- Frosting a Warm Cake: The whipped mascarpone will melt and slide off. Patience is key.
- Over-whipping the Cream: Stop at semi-stiff peaks. If it becomes grainy, it's over-whipped.
- Using Warm Ingredients: Cold dairy is essential for a stable, fluffy frosting.
Conclusion
This Pistachio Cake with Whipped Honey Mascarpone is a celebration of sophisticated flavors and textures. By following the detailed guide and avoiding common pitfalls, you can create a stunning, restaurant-quality dessert at home. The moist, nutty cake paired with the luxuriously creamy and lightly sweetened frosting is sure to impress. Remember the key tips: handle the batter gently, keep everything cold for the frosting, and decorate just before serving for the freshest presentation. Enjoy the process and the delicious results!