Description
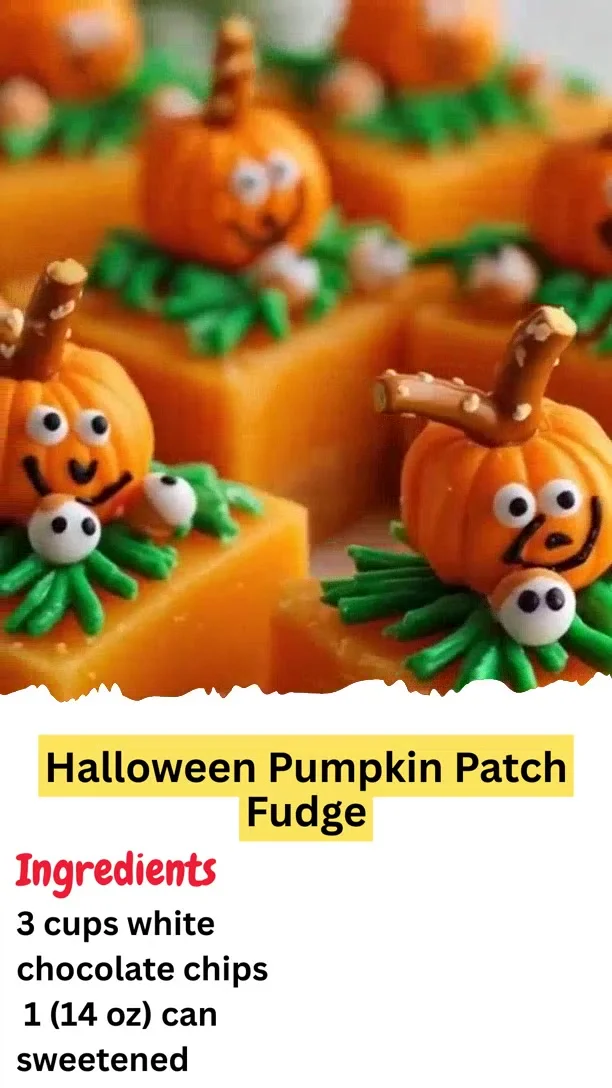
A spooky-sweet treat that’s perfect for Halloween! Creamy, colorful, and fun to decorate, these pumpkin patch fudge squares will be the star of your festive table.
Ingredients:
3 cups white chocolate chips
1 (14 oz) can sweetened condensed milk
1 teaspoon vanilla extract
Orange food coloring
Green candy melts or green colored white chocolate
Pretzel sticks
Candy eyes
Mini chocolate chips
Instructions:
Line an 8x8-inch baking pan with parchment paper. (
2 minutes)
In a microwave-safe bowl, combine white chocolate chips and sweetened condensed milk. Microwave in 30-second intervals, stirring in between, until smooth and fully melted. (
5 minutes)
Stir in vanilla extract and orange food coloring until you achieve a bright pumpkin orange color. (
2 minutes)
Pour the fudge mixture into the prepared pan and spread evenly. Allow the fudge to set for about 15 minutes at room temperature. (
15 minutes)
Melt green candy melts or green colored white chocolate in the microwave, stirring until smooth. (
3 minutes)
Using a small spoon or piping bag, create pumpkin stems on top of the fudge with the green melts. (
5 minutes)
Insert pretzel sticks beside each green stem to create a pumpkin vine effect. (
3 minutes)
Decorate the fudge with candy eyes and mini chocolate chips to add spooky faces or details. (
5 minutes)
Let the fudge set completely in the refrigerator for at least 2 hours before slicing into squares. (
2 hours)
Prep Time: 15 minutes | Cooking Time: 10 minutes | Total Time: 2 hours 25 minutes
Kcal: 220 kcal per piece | Servings: 16 servings
#HalloweenTreats #PumpkinPatchFudge #SpookySweets #FallFavorites
Step-by-Step Guide
Follow these detailed instructions for perfect fudge every time. First, ensure your 8x8 pan is lined with parchment paper, leaving overhang on two sides for easy removal. When microwaving the white chocolate and condensed milk, use a medium power setting (50%) to prevent the chocolate from seizing. Stir thoroughly between each 30-second burst until the mixture is completely smooth. For the orange color, start with 3-4 drops of gel food coloring and add more as needed; gel coloring provides vibrant color without thinning the fudge. After pouring the fudge into the pan, tap it firmly on the counter to release air bubbles and create a smooth surface. Let it set for exactly 15 minutes at room temperature—it should be firm to the touch but not fully hardened before adding decorations.
Serving Suggestions
Arrange the fudge squares on a platter lined with wax paper or decorative Halloween napkins. For a dramatic "pumpkin patch" display, place the squares on a bed of crushed chocolate cookie "dirt" and add a few plastic spiders or skeleton candies around them. These treats pair wonderfully with hot apple cider, strong coffee, or a glass of cold milk to balance the sweetness. They also make fantastic edible gifts when placed in clear cellophane bags tied with orange and black ribbon.
How-to Summary
To make Pumpkin Patch Fudge, melt white chocolate with sweetened condensed milk, then mix in vanilla and orange coloring. Pour into a lined pan and let it partially set. Add green candy melt stems, pretzel stick vines, and candy eyes or mini chocolate chips for faces. Finally, refrigerate until firm before slicing into squares.
Frequently Asked Questions
Can I use dark or milk chocolate instead of white chocolate? Yes, but the orange color will not be as vibrant. You may need to use more food coloring, and the final flavor will be richer.
How should I store this fudge and how long does it last? Store in an airtight container in the refrigerator for up to 2 weeks. The fudge can also be frozen for up to 3 months; thaw in the fridge overnight.
My fudge mixture became grainy. What happened? This usually means the white chocolate was overheated and seized. To salvage it, try stirring in an extra tablespoon of condensed milk until smooth. Always microwave on a lower power setting.
Can I make this fudge nut-free or with allergies in mind? Absolutely. Ensure your chocolate chips and pretzels are certified nut-free. Candy eyes are often made in facilities with allergens, so check labels or use mini chocolate chips to create safe faces.
What can I use if I don't have a microwave? Use a double boiler on the stovetop. Place the chocolate and condensed milk in a heatproof bowl over a pot of simmering water, stirring constantly until melted.
Common Mistakes to Avoid
- Rushing the setting process by putting warm fudge directly in the fridge, which can cause condensation and make the toppings run.
- Using liquid food coloring, which can alter the fudge's texture. Always opt for gel-based colors.
- Overheating the green candy melts, making them too thin for defined stems. Melt slowly and stir well.
- Cutting the fudge before it's fully set, resulting in messy, uneven squares. Patience is key.
- Not lining the pan with parchment paper, making it nearly impossible to remove the fudge cleanly.
Conclusion
This Pumpkin Patch Fudge is more than just a dessert; it's a festive activity and a guaranteed crowd-pleaser. By following this enhanced guide, you'll avoid common pitfalls and create a treat that's as fun to make as it is to eat. Its creamy texture, playful decorations, and perfect balance of sweetness make it an essential addition to your Halloween celebration. Enjoy the process of creating these spooky-sweet squares and the delicious results!