Gluten Free Sourdough Starter (Meal Prep Friendly)


Cooking and Serving: 1 wild yeast sourdough starter
Ingredients
Glass jar or ceramic (must be nonreactive; no metal) | Nonreactive spoon made of wood or silicone (must be nonreactive; no metal) | 1 cup (120 g) whole grain gluten free flour, (See Recipe Notes)
Description
Prep Time: 40 minutes | Cook Time: 0 minutes | Servings: 1 wild yeast sourdough starter
Ingredients
Troubleshooting
Glass jar or ceramic (must be nonreactive; no metal)
Nonreactive spoon made of wood or silicone (must be nonreactive; no metal)
1 cup (120 g) whole grain gluten free flour, (See Recipe Notes)
1 cup (8 fluid ounces) spring water or distilled water, at room temperature
½ cup (70 g) gum-free gluten free flour
½ cup spring water or distilled water, at room temperature
Instructions
CREATING THE STARTER: MORNING OF DAY ONE: BEGINNING.
In a nonreactive container like a glass or ceramic jar, place 1/2 cup (about.
Using a nonreactive mixing spoon (like a wooden or silicone spoon), mix to.
Cover the container loosely, and allow to sit on the counter at room.
CREATING THE STARTER: EVENING OF DAY 1: BUILDING.
Remove the cover of the container, and add another 1/2 cup (about 60 grams).
Using a nonreactive mixing spoon (like a wooden or silicone spoon), mix to.
Cover the container loosely, and allow to sit on the counter at room.
CREATING THE STARTER: MORNING OF DAY 2: BUILDING.
Remove the cover of the container, and add another 1/2 cup (about 60 grams).
Using a nonreactive mixing spoon (like a wooden or silicone spoon), mix to.
Cover the container loosely, and allow to sit on the counter at room.
CREATING THE STARTER: EVENING OF DAY 2: BUILDING.
Remove the cover of the container, and add another 1/2 cup (about 60 grams).
Using a nonreactive mixing spoon (like a wooden or silicone spoon), mix to.
Cover the container loosely, and allow to sit on the counter at room.
Remove the cover of the container, and inspect the contents jar on the counter to see if bubbles begin to break the surface of the.
mixture, and smelling it to see if it has any sour odor at all.
If it does bubble and have an odor, discard any relatively clear liquid that.
has accumulated on top (called “hooch”) + about 1/3 of the volume.
Then feed it: Add another 1/2 cup (about 70 grams) gum-free gluten free flour.
and 1/2 cup (4 fluid ounces) spring or distilled water.
Using a nonreactive mixing spoon (like a wooden or silicone spoon), mix to.
If it doesn’t bubble and have an odor, do not discard but feed with 1/2 cup.
whole grain flour and 1/2 cup water as directed above.
Cover the container loosely, and allow to sit on the counter at room.
The starter is ready to use once it has ever doubled in size, and you have.
been feeding and discarding for at least one whole day.
The doubling is easily disturbed, though, and typically won’t last for very.
Before using the starter, you should have “fed” or refreshed it within.
approximately the previous 12 hours.
After using the properly fed starter, refresh it (see the next step for.
then refrigerate it until it’s ready to be refreshed or used.
REFRESHING (FEEDING) AN ACTIVE/MATURE STARTER.
An active starter can be used for baking, then refreshed and stored, covered,.
in your refrigerator for about a week.
After about a week, you should refresh it. Here’s how you do that.
Refresh your mature starter discarding about 1/3 of the volume (including any clear liquid or hooch from.
Next, add 1/2 cup (70 grams) gum-free gluten free flour and 1/2 cup (4 fluid.
ounces) spring water or distilled water. Mix with a nonreactive spoon.
Cover the starter and allow it to sit on the counter for about 12 hours.
before returning it to the refrigerator.
Repeat the process every week for the life of the starter.
Notes
* Ingredients & equipment
* Gluten Free Sourdough Starter Recipe
Commercial yeast, like the instant yeast granules that we use in our gluten free
many other gluten free bread recipes, is a single, isolated strain of yeast.
A pure “wild yeast” starter contains no commercial yeast at all. A wild yeast
sourdough starter is great when you can’t get your hands on commercial yeast
because the cupboards are bare.
Once it’s “active,” a sourdough starter can be used to create sourdough breads
of all kinds. I have a whole chapter of pure sourdough breads in my bread book,
Those recipes are more complex, and use more than just flour and water. They use
my gluten free bread flour blend which contains some harder-to-source
ingredients. This recipe is for a simple, liquid wild yeast gluten free
sourdough starter, and the recipes are not interchangeable.
It does take time to cultivate, though, to allow the fermentation process to
mature, so it’s not a quick fix. At first, you must take action every 24 hours.
Even after it’s active, it must be maintained week. Otherwise, it may become inactive or over-active and spoiled.
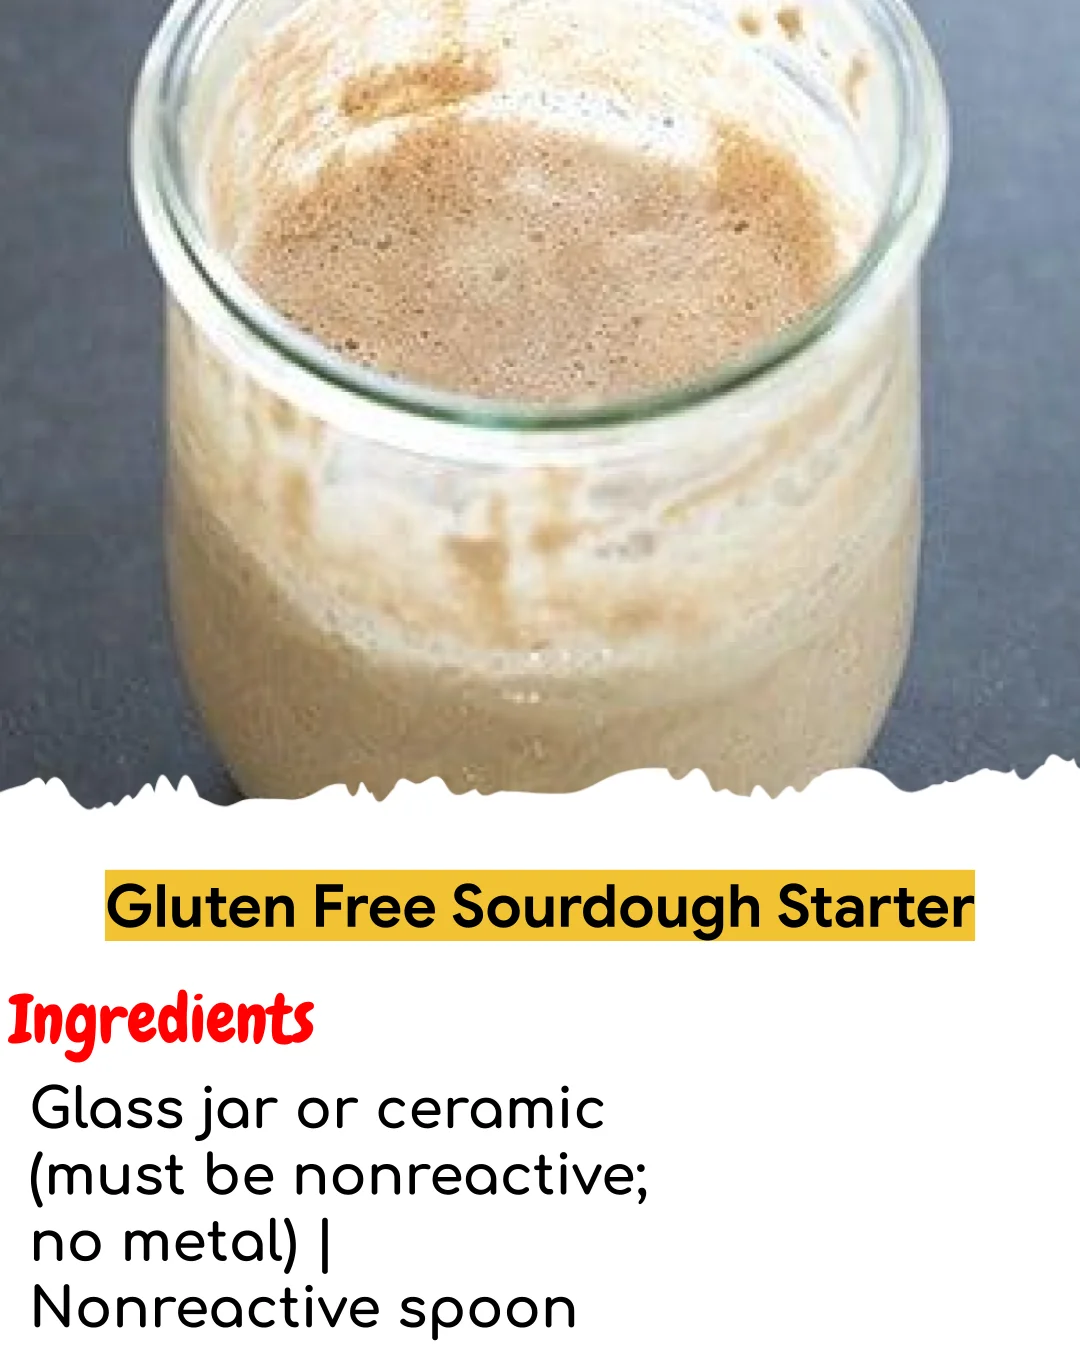
Light brown starter in glass jar being fed with spring water and gluten free
flours, and then being mixed with a nonreactive spoon.
brown starter in glass jar being fed with spring water and gluten free flours,
and then being mixed with a nonreactive spoon.
INGREDIENTS & EQUIPMENT
I have always found it easiest to create a sourdough starter using a combination
of sweet white sorghum flour and teff flour, and following it up with our
gum-free gluten free flour blend
have also successfully made a starter using other types of flours like brown
rice flour, and I have read good things about using buckwheat flour.
You will need to use bottled filtered water or at least distilled water. Regular
tap water contains chlorine which will kill yeast. Make sure that all of your
tools that were washed with tap water are dried completely.
You will also need a nonreactive container like a clean jar and spoon. Stainless
steel is nonreactive, and it’s really fine. In an abundance of caution, I tend
to avoid all metal, especially before the starter is fully active, so a glass
mason jar is great. But don’t make yourself crazy.
image from above of light brown liquid with small bubbles in it in glass jar on
from above of light brown liquid with small bubbles in it in glass jar on black
Yeast bread baking is an art as well as a science, and has a (sometimes very
frustrating) learning curve. Creating a pure wild yeast sourdough starter is
doubly so. The most important ingredient is patience
If you do have a bit of commercial yeast on hand, you can add a few grams to the
mixture to give your starter a boost. Over time, the commercial yeast will be
If you’re tempted to try to increase the ambient temperature surrounding your
starter in an effort to help it grow, you can try lining a heating pad with
multiple layers of towels and keeping it on low. Be careful, though, because all
yeast will die at very high temperatures.
Hand holding glass jar with foamy very light brown liquid showing a rise line
after the starter rose overnight.
holding glass jar with foamy very light brown liquid showing a rise line after
the starter rose overnight.
The doubling sometimes happens so quickly and can be so fragile with this type
of simple wild yeast gluten free starter that I couldn’t even manage to get a
photo of it as doubled.
If you assume it must have doubled because it’s so active, try noticing whether
there is any residue on the jar above the top of mixture that looks like it
could have been left from a risen starter level. You can see in the photo above
that there’s a “rise line” that is above a cleaner section of the jar.
It also might be worth proceeding with a small-yield recipe. It depends upon
whether or not you’re willing to risk wasting some ingredients. You can also
make crackers if the mixture doesn’t rise!
Remember, this is essentially a controlled rot of ingredients using available
wild yeast. Don’t take chances with your health.
If you see something in your starter at any point that has a color you don’t
recognize, or the odor is at all disturbing and different, please discard it and
Honestly, it’s probably just fine. Don’t listen to anyone who tells you that you
have to feed your starter every single day, or that you have to start over again
If you suspect that something has gone wrong, start again if you can. You don’t
want to throw good money after bad.
It’s called “hooch” and you can stir it back in, then discard and feed or just
feed, depending upon which step of the process you’re completing. I prefer to
drain off the liquid because it makes for a more sour starter, and my family
The most common use of a sourdough starter is sourdough bread. Here is a link to
our recipe for gluten free sourdough bread, which you will use to make yeast
bread without any sort of commercial yeast.
A cut in half white bread bread, sitting on top of a wooden cutting board with
crumbs from the cut crust
cut in half white bread bread, sitting on top of a wooden cutting board with
crumbs from the cut crust
Free Sourdough Bread Recipe
Go Ad-Free
GLUTEN FREE SOURDOUGH STARTER RECIPE
Prep Time: 40 minutes mins
Cook Time: 0 minutes mins
Resting time: 7 days d
Yield: 1 wild yeast sourdough starter
gluten free sourdough starter in glass jar
free sourdough starter in glass jar
Learn all the details about how to make a wild yeast gluten free sourdough
starter from scratch, step and use it to make gf bread or whatever you like!
* Glass jar or ceramic (must be nonreactive; no metal)
* Nonreactive spoon made of wood or silicone (must be nonreactive; no metal)
TO CREATE THE STARTER: PER DAY, FOR 5 TO 7 DAYS
* 1 cup (8 fluid ounces) spring water or distilled water, at room temperature
TO REFRESH THE STARTER: ONCE PER WEEK, INDEFINITELY, AND BEFORE/AFTER USING
* ½ cup (70 g) gum-free gluten free flour
* ½ cup spring water or distilled water, at room temperature
CREATING THE STARTER: MORNING OF DAY ONE: BEGINNING.
* In a nonreactive container like a glass or ceramic jar, place 1/2 cup (about
60 grams) whole grain gluten free flour(s) and 1/2 cup (4 fluid ounces)
spring or distilled water.
* Using a nonreactive mixing spoon (like a wooden or silicone spoon), mix to
* Cover the container loosely, and allow to sit on the counter at room
temperature for 8 to 12 hours.
CREATING THE STARTER: EVENING OF DAY 1: BUILDING.
* Remove the cover of the container, and add another 1/2 cup (about 60 grams)
whole grain gluten free flour(s) and 1/2 cup (4 fluid ounces) spring or
* Using a nonreactive mixing spoon (like a wooden or silicone spoon), mix to
* Cover the container loosely, and allow to sit on the counter at room
temperature for 8 to 12 hours.
CREATING THE STARTER: MORNING OF DAY 2: BUILDING.
* Remove the cover of the container, and add another 1/2 cup (about 60 grams)
whole grain gluten free flour(s) and 1/2 cup (4 fluid ounces) spring or
* Using a nonreactive mixing spoon (like a wooden or silicone spoon), mix to
* Cover the container loosely, and allow to sit on the counter at room
temperature for 8 to 12 hours.
CREATING THE STARTER: EVENING OF DAY 2: BUILDING.
* Remove the cover of the container, and add another 1/2 cup (about 60 grams)
whole grain gluten free flour(s) and 1/2 cup (4 fluid ounces) spring or
* Using a nonreactive mixing spoon (like a wooden or silicone spoon), mix to
* Cover the container loosely, and allow to sit on the counter at room
temperature for 8 to 12 hours.
CREATING THE STARTER: MORNING AND EVENING OF DAYS 3 THROUGH 7 AND BEYOND:
BUILDING AND/OR DISCARDING/BUILDING:
* Remove the cover of the container, and inspect the contents jar on the counter to see if bubbles begin to break the surface of the
mixture, and smelling it to see if it has any sour odor at all.
* If it does bubble and have an odor, discard any relatively clear liquid that
has accumulated on top (called “hooch”) + about 1/3 of the volume.
* Then feed it: Add another 1/2 cup (about 70 grams) gum-free gluten free flour
and 1/2 cup (4 fluid ounces) spring or distilled water.
* Using a nonreactive mixing spoon (like a wooden or silicone spoon), mix to
* If it doesn’t bubble and have an odor, do not discard but feed with 1/2 cup
whole grain flour and 1/2 cup water as directed above.
* Cover the container loosely, and allow to sit on the counter at room
temperature for 8 to 12 hours.
WHEN IS IT READY TO USE?
* The starter is ready to use once it has ever doubled in size, and you have
been feeding and discarding for at least one whole day.
* The doubling is easily disturbed, though, and typically won’t last for very
long. It just has to have occurred for you to confidently use it in a
* Before using the starter, you should have “fed” or refreshed it within
approximately the previous 12 hours.
* After using the properly fed starter, refresh it (see the next step for
instructions), allow it to sit covered on the counter for about 12 hours, and
then refrigerate it until it’s ready to be refreshed or used.
REFRESHING (FEEDING) AN ACTIVE/MATURE STARTER.
* An active starter can be used for baking, then refreshed and stored, covered,
in your refrigerator for about a week.
* After about a week, you should refresh it. Here’s how you do that.
* Refresh your mature starter discarding about 1/3 of the volume (including any clear liquid or hooch from
* Next, add 1/2 cup (70 grams) gum-free gluten free flour and 1/2 cup (4 fluid
ounces) spring water or distilled water. Mix with a nonreactive spoon.
* Cover the starter and allow it to sit on the counter for about 12 hours
before returning it to the refrigerator.
* Repeat the process every week for the life of the starter.
Flour for creating the starter.
The best whole grain flours for a gluten free wild yeast starter are: A
combination of sweet white sorghum flour & teff flour; brown rice flour;
Flour for refreshing the starter.
You can continue to use the same whole grain flour to refresh and maintain the
starter, but it will affect the flavor and color of the baked goods you make
Nutrition information is automatically calculated, so should only be used as an
What is a wild yeast sourdough starter?
A wild yeast sourdough starter, gluten free or otherwise, is a combination of
flour and non-chlorinated water that is combined to creative an environment
conducive to the growth of the naturally occurring yeast that is all around us
and in gluten free flours.
It’s essentially a controlled rot, like kombucha, but if you think of it like
that, you may not ever want to make it so let’s move on. When yours is good and
active, as described in the recipe card below, you’ll be ready to bake fresh
gluten free sourdough bread with it!
Are all sourdough starters gluten free?
No! They’re not. If a sourdough starter was made with gluten-containing flours,
it contains gluten and should be avoided if you are on a gluten free diet.
The wild yeast does not remove the gluten from gluten-containing flours. Please
consider the source if anyone tells you otherwise.
What does it mean to “feed” a starter?
“Feeding” a starter is another way of saying “refreshing” a starter. Once a
starter is “mature,” meaning that it’s already active and established, it must
be fed the form of water and flour, that make the starter most active and ready to use
As the yeast in your mature starter rests in your refrigerator, it consumes
these building blocks. To keep it alive and active, a wild yeast starter must be
fed regularly. It also must be fed soon before baking with it, so it’s at its
What are the best gluten free flours to use to build a sourdough starter?
The best whole grain flours for a gluten free wild yeast starter are: A
combination of sweet white sorghum flour & teff flour; brown rice flour;
buckwheat flour. You can use these in whatever combination you like, but each
element should be present to make it easiest to grow wild yeast.
How to make a gluten free sourdough starter from scratch, step for love of the taste or for lack of commercial yeast. Get started today!
to make a gluten free sourdough starter from scratch, step love of the taste or for lack of commercial yeast. Get started today!