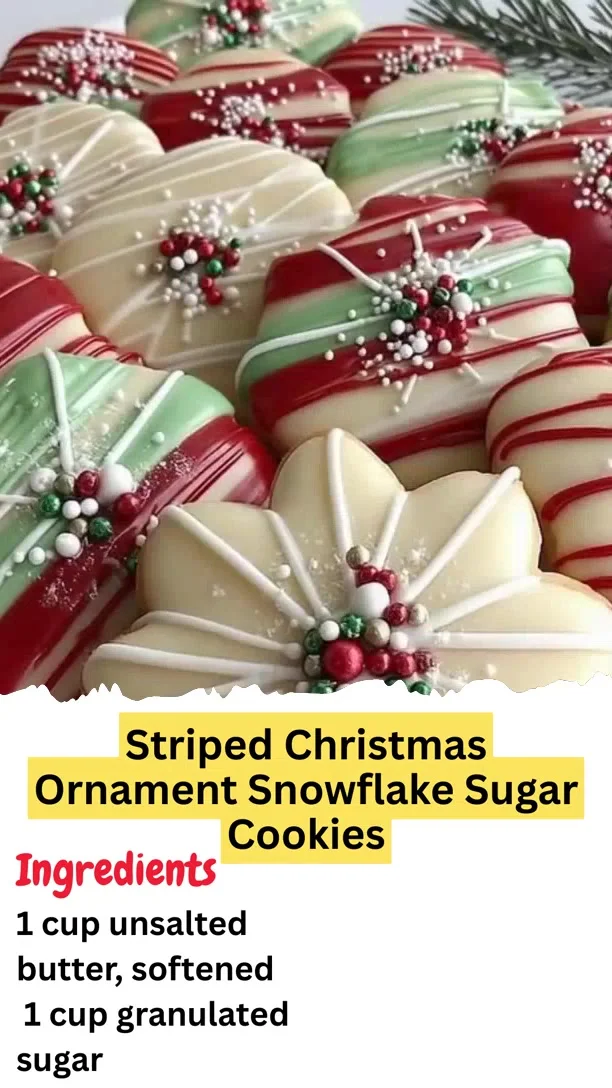
Description
Cozy, festive, and beautifully detailed — these delicate cookies shine like tiny ornaments on a holiday tree. Smooth glaze, crisp edges, and those sweet little sprinkle clusters make every bite feel like Christmas magic.
Ingredients:
1 cup unsalted butter, softened
1 cup granulated sugar
1 large egg
2 teaspoons vanilla extract
1/2 teaspoon almond extract
2 1/2 cups all-purpose flour
1/2 teaspoon baking powder
1/4 teaspoon salt
Icing:
3 cups powdered sugar
3–4 tablespoons milk
1 tablespoon light corn syrup
1 teaspoon vanilla extract
Red gel food coloring
Green gel food coloring
White gel food coloring (optional)
Decorations:
Red, green, white, and gold sugar pearls
White nonpareils
Fine white sugar glitter
Instructions:
Cream the butter and sugar on medium speed for 2 minutes until creamy, not fluffy. (2 minutes)
Add the egg, vanilla, and almond extract, mixing until combined. (1 minute)
In a separate bowl, whisk together flour, baking powder, and salt. Add to wet mixture and mix on low until dough forms. (2 minutes)
Shape dough into a disk, wrap, and chill for at least 1 hour for clean-cut edges. (1 hour)
Roll dough to 1/4-inch thickness and cut out snowflakes and ornament shapes. (10 minutes)
Bake at 350°F (175°C) for 9–11 minutes, removing while edges are still pale. Cool fully. (10 minutes baking + 20 minutes cooling)
Prepare icing by mixing powdered sugar, milk, corn syrup, and vanilla until it reaches a smooth 10–12 second consistency. (5 minutes)
Divide and tint icing red, green, and white. Flood cookies in solid white, red/white stripes, or red/green/white ribbon patterns. Let set 10–15 minutes. (15 minutes)
Drizzle slightly thicker icing in thin white or red lines for that bakery-polished finish. (5 minutes)
Add sprinkle clusters by placing one large red pearl in the center, surrounding with green, white, and gold pearls, then dusting with nonpareils and glitter. (10 minutes)
Let cookies dry completely for 4–6 hours, or 8–12 hours for a fully firm surface. (4–12 hours)
Prep Time: 1 hour 20 minutes | Baking Time: 10 minutes | Decorating Time: 45 minutes | Total Time: 2 hours 15 minutes (plus drying time)
Kcal: 160 kcal | Servings: 24 cookies
#ChristmasCookies #HolidayBaking #FestiveTreats #SugarCookies
Step-by-Step Guide
Follow these detailed steps for perfect cookies. First, ensure your butter is truly softened to room temperature for proper creaming. When adding the dry ingredients, mix only until the dough just comes together to avoid toughness. Chilling the dough is non-negotiable; it prevents spreading and ensures sharp shapes. When rolling, use flour sparingly. For baking, watch closely at the 9-minute mark—the cookies should not brown. For the icing, the 10-12 second consistency is key: drizzle a spoonful back into the bowl; the ribbon should disappear into the surface in that time.
Serving Suggestions
These cookies are a centerpiece themselves. Arrange them on a tiered stand for a festive display. Package them in clear cellophane bags tied with ribbon as heartfelt homemade gifts. Serve alongside a mug of hot cocoa, spiced cider, or a dessert wine. For a party, create a cookie decorating station with extra icing and sprinkles so guests can customize their own.
How-to Summary
In short: Cream butter and sugar, add wet ingredients, then mix in dry ingredients to form a dough. Chill the dough, roll it out, cut into shapes, and bake until just set. Cool completely. Prepare a glaze icing, divide and color it. Flood the cookies with a base layer, let set, then add decorative drizzles. Finish with elegant clusters of sugar pearls and glitter for a professional, festive look.
Frequently Asked Questions
Can I make the dough ahead of time? Yes, the dough disk can be wrapped tightly and refrigerated for up to 3 days. Let it soften slightly at room temperature before rolling.
Why is my icing not smooth? This is usually due to undermixing or powdered sugar lumps. Sift your sugar first and mix the icing thoroughly until completely smooth.
Can I omit the corn syrup in the icing? The corn syrup adds shine and helps the icing set firmly. You can omit it, but the finish may be more matte and slightly less crisp.
How do I store these decorated cookies? Store in a single layer in an airtight container at room temperature for up to a week. Place parchment between layers if stacking is necessary.
My cookies spread too much. What happened? The dough was likely not chilled long enough, or the butter was too warm. Ensure your dough is firm before baking and your oven is fully preheated.
Common Mistakes to Avoid
- Over-creaming the butter and sugar, which incorporates too much air and can cause spreading.
- Rolling the dough too thin, leading to over-browning and breakage.
- Using liquid food coloring instead of gel, which thins the icing and alters its consistency.
- Decorating cookies before they are completely cool, causing the icing to melt.
- Rushing the drying time. The 4-6 hour minimum is crucial for the icing to set properly without smudging.
Conclusion
Creating these stunning holiday cookies is a rewarding project that brings the magic of the season to your kitchen. While the process requires patience—especially for chilling and drying—the result is a batch of professionally decorated, utterly delicious treats that capture the festive spirit. By following the detailed steps and avoiding common pitfalls, you’ll produce cookies that are as beautiful as they are tasty, perfect for sharing and savoring the holiday joy.