Description
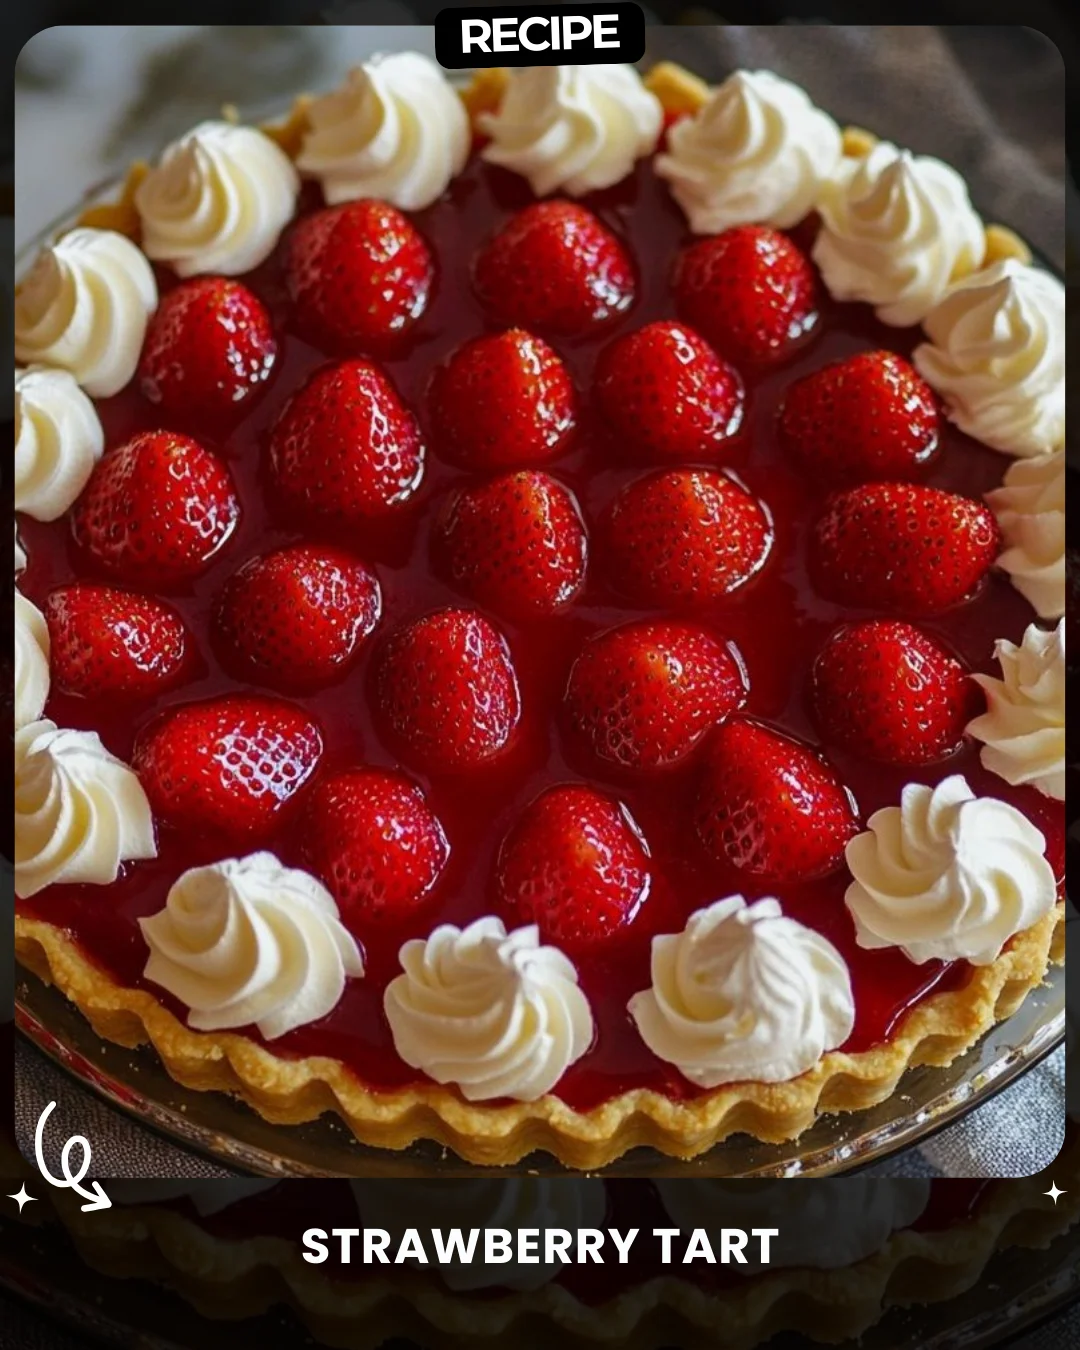
Strawberry Tart
Ingredients:
For the Tart Base:
1 pre-made tart shell or homemade shortcrust pastry
For the Filling:
1 cup vanilla custard (store-bought or homemade)
2 cups fresh strawberries, hulled
For the Glaze:
1/4 cup strawberry jam
1 tablespoon water
For Decoration:
1/2 cup whipped cream, piped
Instructions:
1. Prepare the Base: Bake the tart shell according to package instructions or until golden and crisp. Let it cool completely.
2. Add the Filling: Spread the vanilla custard evenly over the cooled tart shell.
3. Arrange the Strawberries: Place the fresh strawberries over the custard, starting from the center and working your way outwards.
4. Glaze the Tart: In a small saucepan, heat the strawberry jam and water over low heat until smooth. Brush the glaze over the strawberries for a shiny finish.
5. Decorate with Whipped Cream: Pipe whipped cream around the edges of the tart for an elegant touch.
6. Chill and Serve: Refrigerate for 1 hour before serving.
#StrawberryTart #ElegantDessert
Step-by-Step Guide
Follow this detailed guide for a flawless tart. First, ensure your pre-baked tart shell is completely cool to room temperature; a warm shell will melt the custard. For the filling, if using homemade custard, ensure it is thick and chilled. Use an offset spatula to spread it in a smooth, even layer. When arranging the strawberries, select berries of similar size. Begin by placing a whole strawberry in the very center. Then, create concentric circles around it, working outwards. For the outer edge, you can halve the strawberries and place them cut-side down for a neat border.
For the glaze, gently warm the jam and water until it becomes a thin, brushable syrup. Let it cool for a minute, then use a pastry brush to apply a light, even coat over each strawberry. This seals in moisture and adds gloss. Finally, use a piping bag with a star tip to create whipped cream rosettes or dollops around the tart’s perimeter. Chill for at least one hour to allow the tart to set properly for clean slicing.
Serving Suggestions
This tart is versatile. Serve it as the centerpiece of an afternoon tea, accompanied by other small pastries. For a dinner party, plate individual slices with a drizzle of raspberry coulis or a dusting of powdered sugar. A scoop of vanilla bean ice cream or a dollop of crème fraîche on the side makes it extra special. Pair with a glass of sparkling wine or a cup of Earl Grey tea.
How-to Summary
In brief: Cool the baked shell, spread with custard, artfully arrange strawberries, glaze with warmed jam, decorate with piped cream, and chill thoroughly before serving.
Frequently Asked Questions
Can I make this tart ahead of time? Yes, you can assemble the tart (without the whipped cream) up to 6 hours ahead. Add the whipped cream just before serving to prevent it from deflating.
What can I use instead of vanilla custard? Pastry cream (crème pâtissière) is an excellent alternative. For a lighter option, consider a layer of sweetened mascarpone cheese or vanilla-flavored whipped cream.
How do I prevent a soggy crust? The key is a fully cooled, crisp shell. You can also create a moisture barrier by brushing the cooled shell with a thin layer of melted white chocolate before adding the custard.
Can I use frozen strawberries? It’s not recommended for the topping, as they release too much water and become mushy. Use only fresh, firm strawberries for the best presentation and texture.
How should I store leftovers? Cover loosely and refrigerate for up to 2 days. Note that the crust will soften over time.
Common Mistakes to Avoid
- Adding custard to a warm tart shell, which causes weeping and sogginess.
- Using overripe or bruised strawberries that lack structure and bleed color.
- Applying the glaze while it’s too hot, which can cook the strawberries slightly.
- Skipping the chilling step, which is crucial for the tart to set for clean slicing.
- Overloading the tart with whipped cream, which can overwhelm the delicate strawberry flavor.
Conclusion
This strawberry tart is a classic dessert that balances simplicity with stunning visual appeal. By following the detailed steps and avoiding common pitfalls, you can create an elegant, crowd-pleasing treat perfect for any occasion. Its combination of crisp pastry, creamy custard, fresh fruit, and glossy finish is timeless. Enjoy the process and the delicious results!