


Description
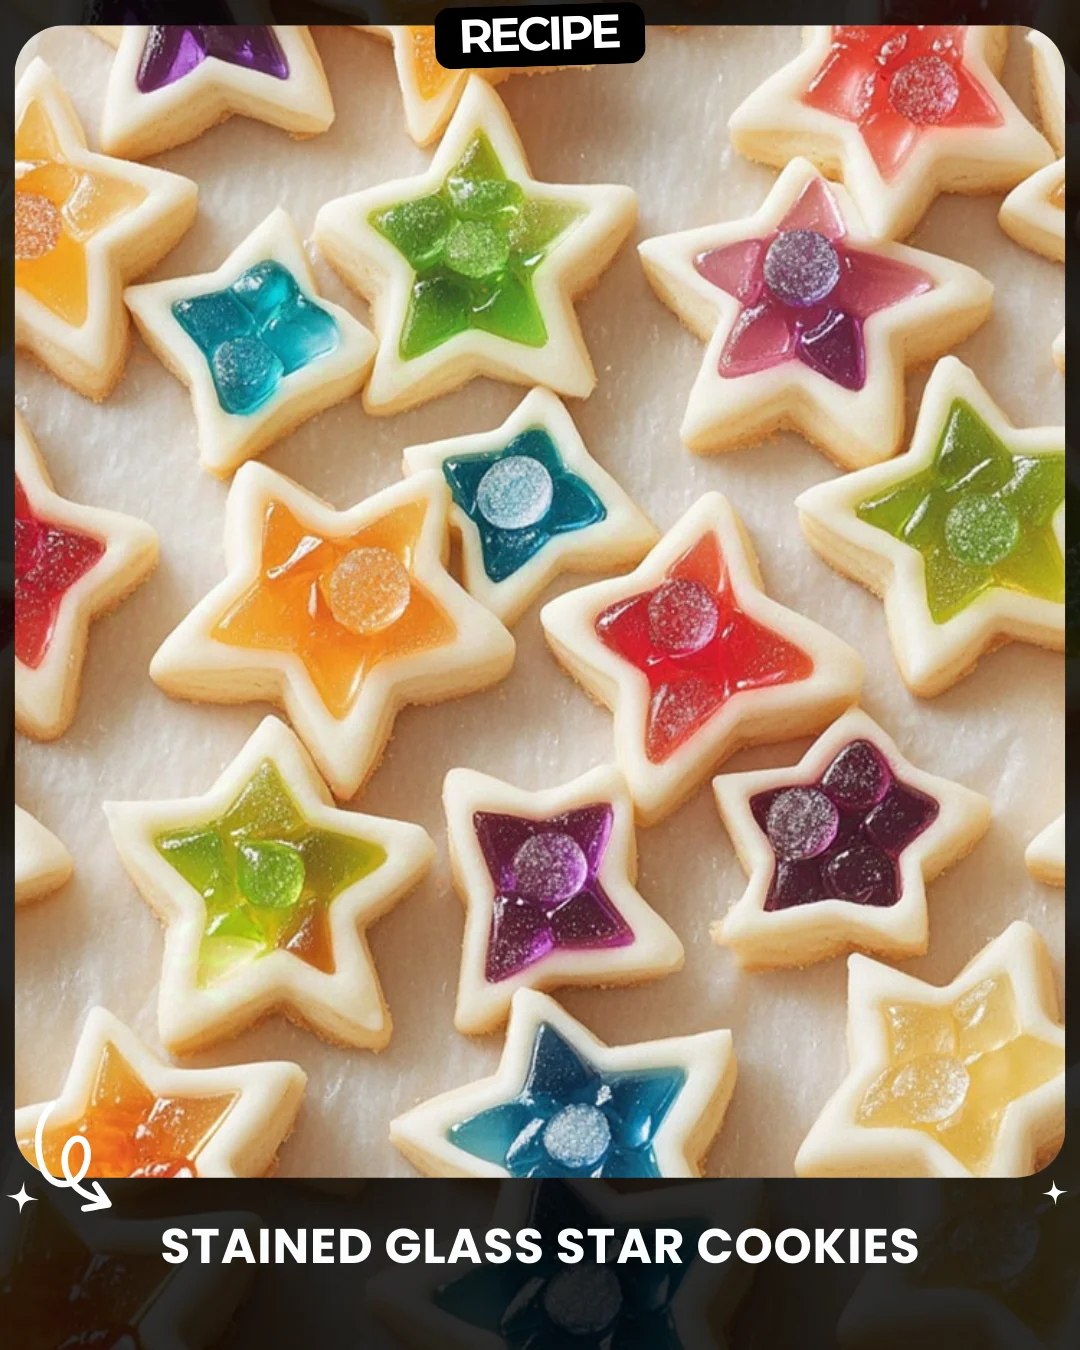
Stained Glass Star Cookies
Ingredients:
2½ cups all-purpose flour
¾ cup softened butter
1 cup brown sugar
1 large egg
1 tsp vanilla extract
½ tsp cinnamon
Crushed red and green hard candies
Preparation Steps:
Preheat oven to 350°F (175°C). Prepare baking sheets.
Cream butter and brown sugar. Add egg and vanilla.
Mix in flour and cinnamon, forming a dough. Chill for 20 minutes.
Cut stars, remove centers, and fill with candies.
Bake for 10 minutes until edges are firm. Cool.
Cinnamon and candy make the perfect holiday treat! Like if you’d bake this. #HolidayStarCookies
Step-by-Step Guide
Follow these detailed instructions for perfect cookies every time. First, preheat your oven to 350°F (175°C) and line your baking sheets with parchment paper. In a large bowl, use an electric mixer to cream the softened butter and brown sugar until light and fluffy, about 2-3 minutes. Beat in the egg and vanilla extract until fully combined. In a separate bowl, whisk together the flour and cinnamon. Gradually add the dry ingredients to the wet mixture, mixing on low speed until a soft dough forms. Wrap the dough in plastic and chill in the refrigerator for at least 20 minutes; this prevents spreading.
On a lightly floured surface, roll the dough to about 1/4-inch thickness. Use a large star-shaped cookie cutter to cut out shapes. For the stained glass effect, use a smaller star cutter (or knife) to remove the center of each cookie. Place the cookies on the prepared sheets. Carefully fill the cut-out centers with your crushed hard candies, keeping the colors separate for a clean look. Bake for 10-12 minutes, or until the cookie edges are lightly golden and the candy centers are molten. Let the cookies cool completely on the baking sheet until the candy hardens again.
Serving Suggestions
These cookies are a stunning addition to any holiday dessert table. For a festive platter, arrange them on a bed of edible gold flakes or powdered sugar to mimic snow. They make beautiful edible ornaments; simply use a skewer to make a small hole in the top of each cookie before baking, then thread with ribbon after cooling. Pair them with a warm mug of spiced apple cider, hot chocolate, or a glass of cold milk. They also make thoughtful, handmade gifts when packaged in clear cellophane bags tied with a ribbon.
How-to Summary
- Make dough: Cream butter & sugar, add egg & vanilla, mix in dry ingredients.
- Chill dough for 20+ minutes to prevent spreading.
- Roll, cut into stars, and remove centers.
- Fill centers with crushed hard candies.
- Bake at 350°F for 10-12 mins until edges are firm and candy is melted.
- Cool completely on the baking sheet before handling.
Frequently Asked Questions
Can I use different candy colors? Absolutely! Use any clear hard candies like Jolly Ranchers. Traditional holiday colors are red and green, but blues and yellows work beautifully too.
Why did my candy centers bubble over? This happens if you overfill the centers. Use just enough crushed candy to fill the hole level with the cookie dough; it will spread as it melts.
Can I make the dough ahead of time? Yes. The dough can be refrigerated for up to 3 days. Let it sit at room temperature for 10 minutes before rolling for easier handling.
How do I store these cookies? Store in a single layer or with parchment between layers in an airtight container at room temperature for up to one week.
My cookies spread too much. What went wrong? The dough likely wasn’t chilled long enough, or your butter was too soft. Ensure your dough is firm before baking and your oven is fully preheated.
Common Mistakes to Avoid
- Not chilling the dough: This leads to excessive spreading and misshapen stars.
- Overfilling with candy: Causes the melted candy to run over the cookie edges.
- Moving cookies too soon: The candy center needs to fully harden on the baking sheet. Moving them warm will cause breakage.
- Using improperly crushed candy: Pieces should be small, like coarse sand. Large chunks won’t melt evenly.
- Rolling dough too thin: Aim for 1/4-inch thickness so the cookie structure can support the candy window.
Conclusion
These Stained Glass Star Cookies are more than just a treat; they’re a festive baking project that yields dazzling, edible works of art. The combination of spiced cinnamon dough and shimmering candy centers captures the magic of the season. By following the detailed guide and avoiding common pitfalls, you can create a stunning holiday staple that is sure to impress family and friends. The process is as rewarding as the result, making memories in the kitchen that are as sweet as the cookies themselves. Happy baking!